Tables need some extra attention to keep them ADA compliant. There are also times when tables shouldn't be used.
Tables help organize content in meaningful ways, but with the advent of ADA, they require special attention in order to serve the information up to screen readers in the best way.
It's best to create tables using a designated container separate from the other text content on your page. In other words, drop in a new Text widget between other text just for housing the table. This allows us to target that table and override it individually if you needed to later. See a visual example below that shows how the table is isolated in its own text widget.

How to add a table to a page
Method 1: New from scratch
- While in the Text widget, click the table icon in the top toolbar (see screenshot)

- Select the number of rows and columns your table will need.
- We recommend you set your table width to 100% for best rendering across browsers.
- Set spacing, padding and borders to 0 and click OK.
Now you can add your data in the cells and be sure to add a table header (explained more below.
Method 2: Copy table code from elsewhere
- Copy and paste the table over into the WYSIWYG editor.
- Highlight the table and its contents.
- Click on "Tx" in the editor's toolbar to clear foreign styles migrated over.
- Right-click on the table and from the shortcut menu select "table properties."
- In the Table properties dialog box:
- Zero out any height, padding and spacing values that are there.
- Enter "100%" in the width field
- From the header pull-down menu select one of the following: none, first row, first column, or both
- Enter either the subject or a summary of the table.
Best-practices in table structure
- Have the border, cell padding and cell spacing attributes zeroed out
- Have table width set to 100%
- Have a clear distinction of the head row using both the <thead> and <th> tags as shown below
- If possible have a caption or a summary for the table. Both are described below;
- A caption (a brief description of the table) is not necessary for every table but it is generally very helpful for ADA compliance. It informs a viewer about what the content is within the table. If a caption is entered for a table, it will appear above the table (example is shown below) and can be styled.
- A summary, on the other hand, is a description on how the table is set up, making it easier for visitors to navigate it. Especially if the table is set up in a unique way. While it is not visible on the page, it is for those using text readers and is usually only needed for complex tables.
- The following shows how a table should be structured by the time you are done, using a caption and summary.
The finished table (color determined in the global CSS)
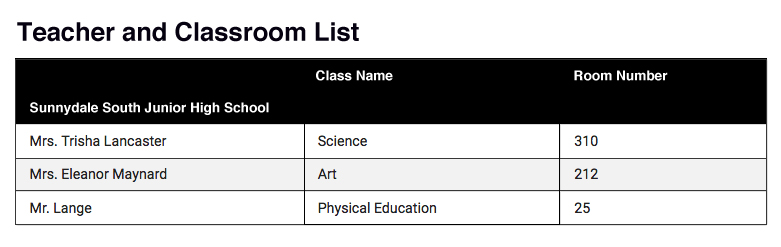
The table as seen by a screen reader:
<table border="0" cellpadding="0" cellspacing="0" style="width:100%;" summary="This is a list of classrooms by teacher.">
<caption>Teacher and Classroom List</caption>
<thead>
<tr>
<th scope="col">Sunnydale South Jr. High School</th>
<th scope="col">Class Name</th>
<th scope="col">Room Number</th>
</tr>
</thead>
<tbody>
<tr>
<td>Mrs. Tricia Lancaster</td>
<td>Science</td>
<td>310</td>
</tr>
<tr>
<td>Mrs. Eleanor Maynard</td>
<td>Art</td>
<td>212</td>
</tr>
<tr>
<td>Mr. Lange</td>
<td>Physical Education</td>
<td>25</td>
</tr>
</tbody>
</table>
Frequently asked questions about tables
- How do I apply a style to a table?
To apply a style to a table, select the table and go to the Styles menu (located in the first row of the toolbar), there you will be able to select one of the predetermined styles that was created for your web site? - How do I edit a table that has already been created?
To edit a Table, position the cursor over the table, hold down the Ctrl and click (Mac) or Alt and Right-click (PC). This will bring up a menu that allows you to edit cells, rows, and columns. Giving you additional options for each. It also allows you to quickly delete the table or view its properties.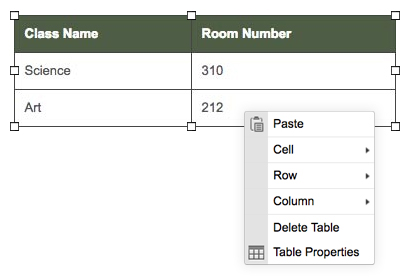
- How do I insert a row or column?
To insert a row or column into a table, position the cursor over the table and click on a cell where you would like to insert the row or column, press and hold down the Ctrl and click (Mac) or Alt and Right-click (PC). To add a Row (shown below) position the cursor over Row on the menu. An additional menu will appear to the right, select either Insert Row Before or Insert Row After. If you need to delete a row you would select Delete Rows. To add a Column position the cursor over Column, a menu will appear to the right with options, select either Insert Column Before or Insert Column After. If you need to delete a column you would select Delete Columns.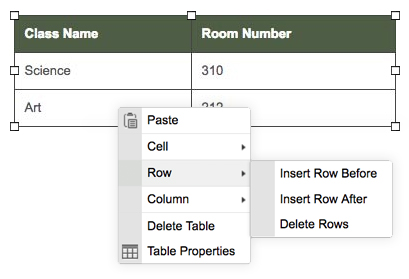
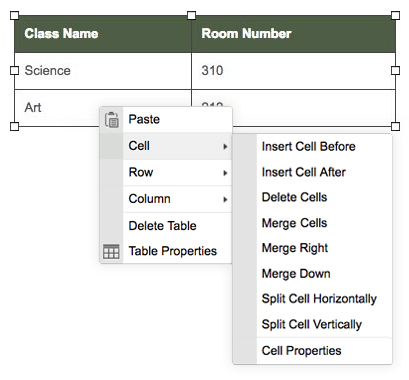
- How do I merge or split cells?
If you need to merge cells select the cells you would like to merge, press and hold down the CTRL button and click. Position the cursor over Cell in the menu, options will appear to the right, select Merge Cells. If you want to merge a cell either right or down, select the cell and press Ctrl and click (Mac) or Alt and Right-click (PC). Position the cursor over Cell in the menu and options will appear to the right, select either Merge Right or Merge Down.
To split a cell select the cell you would like to split, press and hold down the Ctrl and click (Mac) or Alt and Right-click (PC) on the table. Position the cursor over Cell in the menu, a menu with options will appear to the right, select either Split Cell Horizontally or Split Cell Vertically.