To add a gallery to SchoolNow, navigate to either the department you would like to add the gallery to and click +Add Content or click +Add in the top navigation bar, select the department you would like to add the gallery too and do the following steps
- Select Gallery.
- Enter the information for the event, fields and their descriptions are listed below;
- Title - Enter the title of the gallery
- Posted Date - Enter the date and time that you want the gallery to be made live.
- Description - A description of the gallery which can include links and images.
- Additional information that can be updated for the gallery can be found in the Advanced tab.
- URL - This is auto-filled with the title of the event. It can be customized.
- Page title - Title of the alert
- Page description - Enter a short description of the alert
- Page Keywords - Enter keywords that are relevant to the alert for use by search engines.
- Search robots - Tell robots whether or not to index the alert. Please note that not all robots will acknowledge this.
- To start uploading photos to the gallery, follow the directions listed below in the How do I add a photo to a gallery?
- After you've filled out the necessary information, make sure to click the Save --> Publish options just as you would when you're editing pages.
SchoolNow Tip - Ideally, when you plan to set up a gallery, it's easier to create a folder dedicated to that specific gallery in the File Manager of the department that you want the Gallery to be in, rather than to hunt through a main image folder.
How do I find a list of galleries associated with a department?
To see a list of galleries associated with a department in SchoolNow, navigate to the department that they are kept in and click on Gallery in the module list.
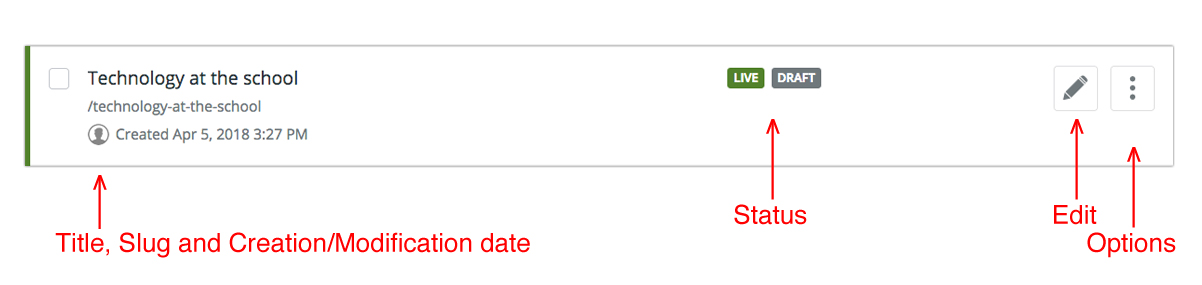
What does the vertical color bar to the left of a gallery's title mean?
On the left side of the gallery's title, you will see a vertical bar, normally this will be grey but it can also be green which means that it is live (viewable by visitors to the site).
What is the status of a gallery?
You can find the status of a gallery by looking to the left of the event's title, there you will find if it is LIVE, if there is a DRAFT of the gallery, if it is SCHEDULED to be made live, if it is SHARED and finally if it is LOCKED, meaning someone else is working on it.
How can I find out what department is sharing a gallery?
If a gallery is marked as SHARED you can quickly find out what department is sharing it by looking under its title for Owned by.
How do I set a gallery so it is published at a later date/time?
You can easily set a later publication date/time when saving a gallery by choosing Publish Content and setting the date/time you would like it to be made live. Please note, this will not override any dates/times that are set for items such as alerts or articles, they will still be made live on the times set for those items.
How do I revert to an older version of a gallery?
There are two ways to revert to an older version of a gallery in SchoolNow. The first is by clicking on the three vertical dots located to the right of the gallery's title and select View Live History from the menu. The second way to revert to an older version of a gallery can be found when previewing the gallery, click on the downward carrot icon to the right of Edit Gallery and select Gallery History. On the following screen for both select the version you would like to revert to by clicking on the arrow to the right of the version and finally Back to Gallery List to return to view the post list view of the current department.
Please note that this option will not be available if the gallery has never been made live before
How do I find a list of Past drafts for a gallery?
To view a list of past drafts for a gallery, click on the three vertical dots located to the right of the gallery's title and select View Past Drafts from the menu. For more information on the Drafts Menu please visit the article 'What are Drafts?' To return to the gallery list view of the current department click on Back to Gallery List.
How do I clone a draft?
If for some reason you find that you need to clone a draft, for example when it has been rejected or closed, click on the three vertical dots located to the right of the gallery's title and select View Past Drafts from the menu. On the following screen click on the three vertical dots located to the right of the correct draft and select Clone Content from the menu, then Save --> Save as New Draft.
How do I edit a gallery in SchoolNow?
To edit a gallery in SchoolNow, navigate to the department that it is kept in, click on Gallery in the module list and then the Pencil icon to the right of the gallery's title.
How do I duplicate a gallery?
To duplicate a gallery, navigate to the department that it is stored in, click on Gallery in the module list, then click on the three vertical dots located to the right of the gallery's title and select Clone Content from the menu. Enter the Title of the duplicate event and click on the spinning arrow icon to the right of Slug to refresh the slug and then Save --> Save as New Draft or Submit for Publication.
How do I move a gallery to another container (department)?
To move a gallery, navigate to the department that it is stored in, click on Gallery in the module list, then click on the three vertical dots located to the right of the gallery's title and select Move To... from the menu. Finally, select the container (department) you would like for it to be moved to.
How do I share or stop sharing a gallery with multiple departments?
There are two options for sharing a gallery between multiple departments. The first is to navigate to the department that it is kept in, click on Gallery in the module list then click on the vertical of three dots located to the right of the gallery's title and select Share from the menu.
Finally, select the container (department) you would like for it to be shared with and then Share at the bottom of the window.
- To stop sharing a gallery, navigate to the department that it is kept in, click on Gallery in the module list and click on the three vertical dots located to the right of the gallery's title and select Share from the menu Finally select the container (department) that you would like to stop sharing the gallery with and then Share at the bottom of the window.
To delete a gallery, navigate to the department that it is stored in, click on Gallery in the module list, then click on the three vertical dots located to the right of the gallery's title and select Delete from the menu. Please remember once a gallery is deleted it cannot be recovered.
How do I add a photo to a gallery?
To add a photo to a gallery, navigate to the department that contains the gallery and do the following steps.
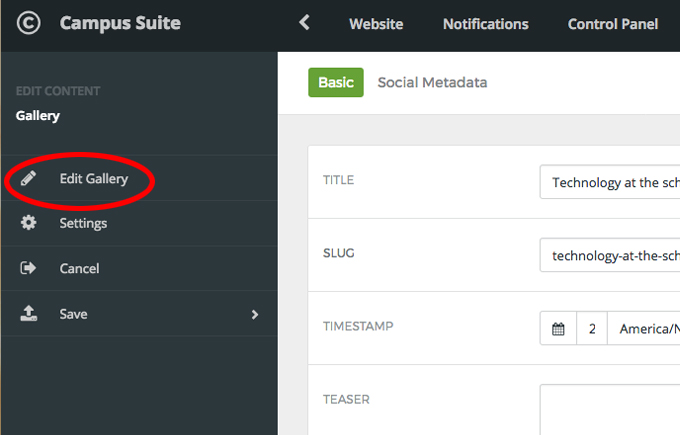
- Select the gallery that you would like to add the photo to by clicking on the pencil icon to the right of the gallery you would like to add the photo too followed by Edit Gallery (see above) in the left navigation.
- Click the green +Photo in the upper right-hand corner.
- Enter the information for the image, fields and their descriptions are listed below;
- Media - Select the image to add to the gallery. This image will be displayed in the thumbnail.
- Title - Title of the photo.
- ALT text - To maintain ADA compliance, please remember to enter text into this field. This is simply a basic description of the image.
- Description - A description of the photo which can include links.
- After you've filled out the necessary information, make sure to click the Update located at the bottom of the screen and then if you are done adding photos to the gallery, click on Save --> Publish in the side navigation.
How can I select a folder to upload to a gallery?
To add a folder or a group of photos to a gallery, navigate to the department that contains the gallery and do the following steps.
- Select the gallery that you would like to add the photo to by clicking on the pencil icon to the right of the gallery you would like to add the photo too followed by Edit Gallery (see above) in the left navigation.
- Click ton Import Folder in the upper right-hand corner.
- Navigate to the folder that you want to upload to the gallery or create a folder and upload photos to it. After finding the folder or uploading new photos click on Select All or the plus sign to the right of the folder's name.
- After you have uploaded the images remember to click on Save --> Publish in the side navigation.
Note - If for some reason you need to upload a folder of images to a gallery again, new images will be added to those that are there. Any details that were added to the photos that were already in the gallery will not be overwritten.
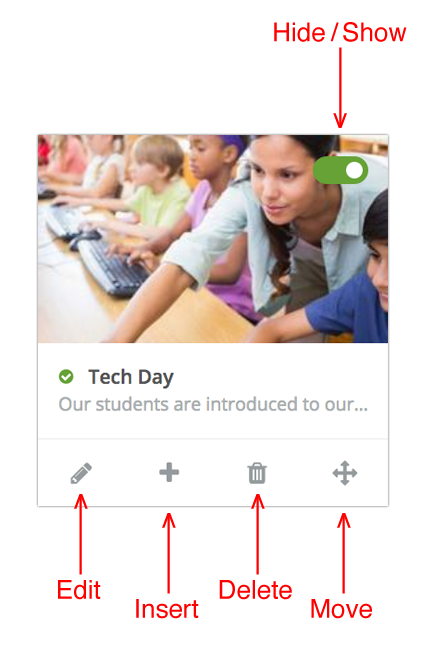
To edit a photo from a gallery, click on the pencil icon under the photo that you want to edit and select Edit Details. Remember to maintain ADA compliance each image in a gallery should have ALT text . After editing the image click on Update and then Save --> Publish in the side navigation.
How do change a photo in a gallery?
While editing a photo you can update/edit the photo that is there by either clicking on the media (current picture) and selecting the image that you want to replace it with or you can click on Remove Image and then clicking on the empty box above it then selecting the new image. After changing the image click on Update and then Save --> Publish in the side navigation.
How do I make a photo a Feature Image?
To make a photo the feature image of a gallery, click on the pencil icon under the photo that you want to make the feature image and select Feature Image. After making an image a favorite click on Publish in the side navigation. Please note there can only be one feature Image per gallery.
How can I tell if an image is a Feature image?You can easily determine which image is the Feature Image, if any, of a gallery while editing the gallery. If a gallery has a feature image the image will have a checkmark to the left of its name, which is shown above.
How do I insert a photo into a specific place in the gallery?
To insert a photo into a specific location in a gallery, click on the plus sign under the photo you want to place the new photo before or after. Select if you want to Insert Before (places the new photo to the right) or Insert After (places new photo to the left). After inserting an image click on Publish in the side navigation.
How do I remove photos from a gallery?
To remove a photo from a gallery click on the trash can icon under the photo that you want to remove. Please remember if a photo is removed from a gallery it will need to be re-uploaded to the gallery. After removing an image click on Save --> Publish in the side navigation.
How do I organize a gallery?
To reorganize the gallery, click on the multi-directional arrow icon under the photo that you want to move. Depending on where the image is located choose either Move Backward (shift one spot to the left) or Move Forward (shift one spot to the right). After organizing a gallery click on Publish in the side navigation.
Please Note: That there might be some slight differences in the order of images to what is set in the module when displayed on a page. This is to help make pages more aesthetically pleasing.
Additional Articles
How do I do change or override the default headings on a module?Social Metadata - Reviews the Social Metadata button available with each gallery.
What are Drafts? - Reviews Drafts
