This article will instruct you on preparing a faculty/profile data import sheet and bulk import profiles into your website in SchoolNow.
Typically, data can be exported from your current system into .xls or .csv formats. These sheets are OK to use, but the data may need to be edited so that they import with little to no errors. We recommend using our Faculty-Staff Data Import template as a base to work off of, so let's review the columns you will find.
- Unique_ID - Optional - Used if Indexing is activated when the import is created. This allows for the syncing of profiles over multiple imports. The Unique_ID of a person should not change and be unique to the person. We recommend that you assign each person a unique ID number and record them for any future updates.
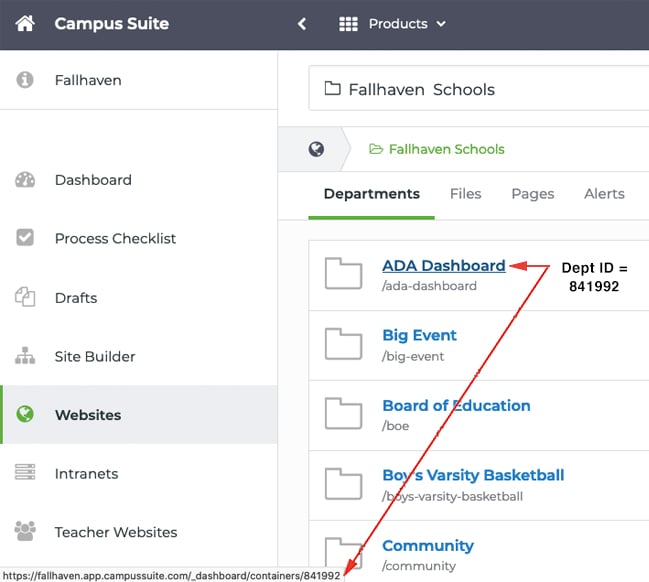
- Owning Department ID - Required - ID of the department that should receive the profile. This can be either the Department ID which can be found by taking your cursor over the department's title in the department list view and recording the series of numbers after the last forward-slash (shown below), or the department name.
- Sal - Salutation
- Last Name
- First Name
- Title
- Suffix
- Phone w/ Ext
- Fax
- Biography
- Teaser - Optional - This is a brief description of the person. The teaser text shows out on the listing views and in widgets before the profile is clicked on.
- Mailing Location
- Office Location
- Picture File - URL of where the file is located.
Example - 1717638/j.jpg
To get the ID number of the folder that the image is in, navigate to the folder that the images are stored in the file manager. Copy the last set of numbers listed in the URL for the folder, for the following, 1717638/j.jpg
The URL for the folder is https://fallhaven.app.campussuite.com/_dashboard/files/1615710/1717638. Copy the last set of numbers (in bold), then a backslash ( / ), and finally the file name.
- Link - Link to the person's personal website.
- Shared Departments - Required - ID of the department that should receive the profile. This can be either the Department ID which can be found using the example above, or the department name. If the profile needs to be shared with multiple departments, separate them with a pipe ( | ).
Example - Brendan Rich High School|LandonElementary - Tags - Optional - Used for the customized output of a widget. Enter the appropriate tags that have been entered into SchoolNow. If the profile needs to use multiple tags separate them with a pipe ( | ).
Example - Science|Athletics|Teaching Staff - Rank - See the article, How can change the order of People Profiles or FAQ Questions for a department? for additional information on this field.
How do I import data for People profiles?
- After logging into your site, click Settings, the gear located in the top navigation bar, followed by System Settings in the left navigation on the next screen.
- Click on Imports followed by the Import button at the top-right of the screen, then select People as the import type.
- On the following screen, enter the import name, which is just a name that is friendly to you. This is not shown to the public. You can also add an optional description. Then if you like click, on the switch to the right of Indexed to allow for the syncing up of events with any future imports, and finally click Create.
- You'll now see your import ready to manage. Click the three vertical dots to the right of the job and select Upload New Sheet to upload your import sheet. Browse to choose your sheet, and click Save.
- With your sheet now uploaded, click the three vertical dots again to the right of the job and select Mappings from the options given. This is simply telling SchoolNow what columns to find your data in. If you used the import sheet, we provided above, and these mappings should automatically line up. If they don't, simply interact with each of the pull-down menus to specify which column in your sheet should be used to pull that data into the proper column in SchoolNow (the field names at left). Once done, click Save.
It's OK to leave fields blank when you are mapping the columns in your spreadsheet to the proper field, but remember, the Owning Department ID, first name, and last name are required (Index if you chose to have the import Indexed).
- Now click the three vertical dots to the right of the job one last time and select Process Import from the options given, select Test, and if there are no errors select Process. If there are any problems, SchoolNow will tell you. If it successfully imports, you will be taken back to the import jobs screen and see your job now is labeled Processed (also Updatable if the index switch was clicked).
Congratulations, you can now go to your departments and find all your faculty profiles.
How do I update the sync for the People profiles?
- After logging into your site, click Settings, the gear located in the top navigation bar, followed by System Settings in the left navigation on the next screen.
- Click on Imports followed by People. This will display a list of imports that are in the system.
- If you see one that is labeled Updatable, click on the three vertical dots and select Upload New Sheet followed by Process Import, Test, and finally, Process.
-
- If not, follow the instructions above to do a new import. After that is complete, click on the three vertical dots to the right of the old import and select Purge.
- If not, follow the instructions above to do a new import. After that is complete, click on the three vertical dots to the right of the old import and select Purge.
