Administrators can manage everything from user logins, roles, permissions and data imports, domain configuration, and tags.
Administrators, click Settings (gear icon) at the top-right of the dash bar.
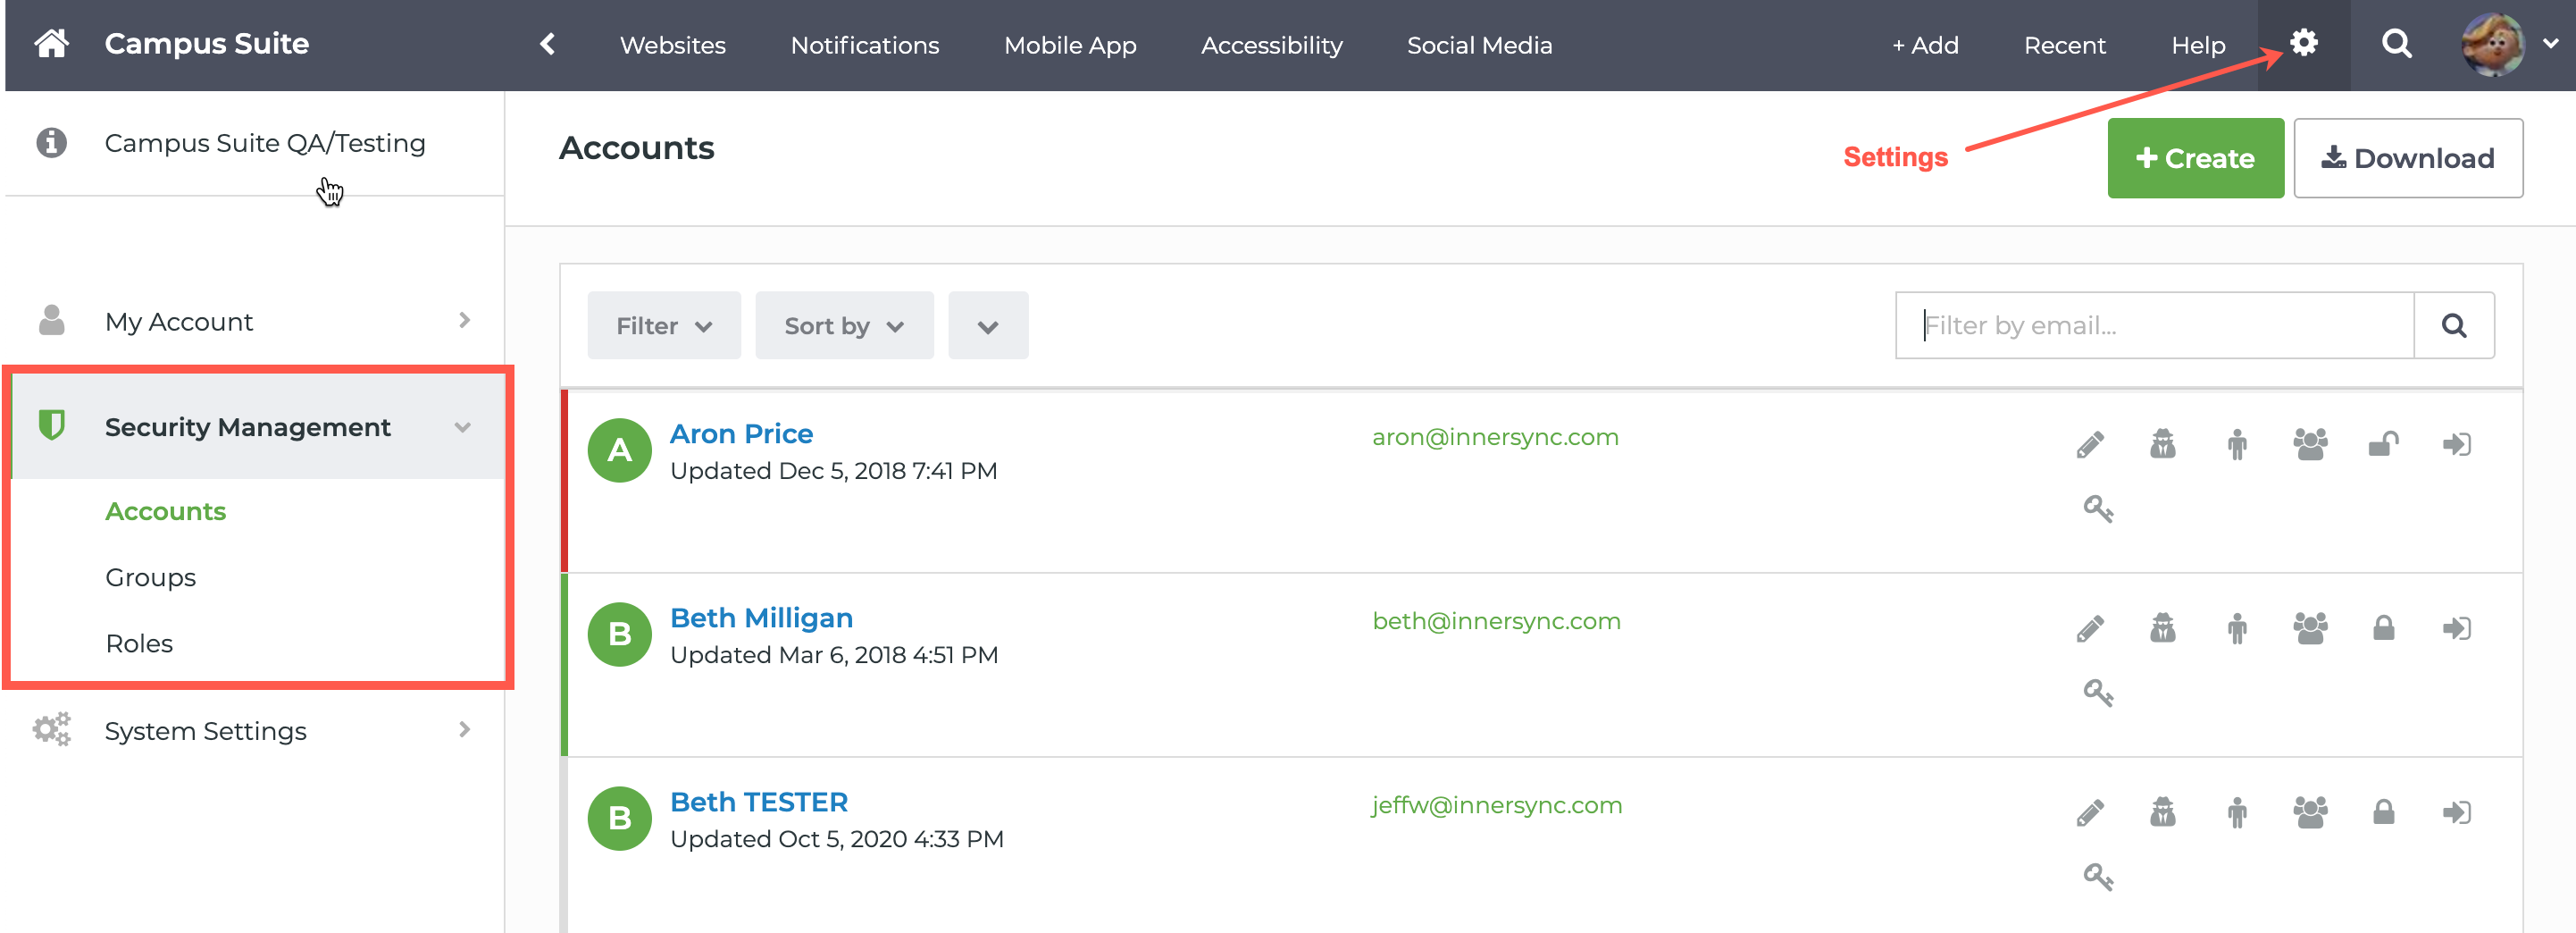
Click Security Management in the left navigation to access Accounts and manage permissions.
Accounts
See and manage accounts in the system, or add new accounts. Before adding a new user login account, check to make sure that person is not already in the system by searching with all or part of the person's email at top-right.
There are various types of authentication in SchoolNow. Simple user authentication is where the user logs in with their email address and a password that is established. Single Sign-On is established by your organizations website administrator.
Adding and managing user accounts
Before adding a new user account, search to make sure that person doesn't exist yet. Having multiple user accounts can lead to conflicts. Often, an existing publisher may request an administrator to grant them access to a new area of the website. In this case, you would edit the current user, granting them access to the new area.
No matter the type of authentication you use, the user accounts are used to limit a person's access to certain areas and gives them certain privileges around the site based on their permissions. Permissions are governed using Groups and Roles.
- How do I add a User Account?
To add an account, click on Accounts and then the green +Create in the upper right-hand corner. Fill out the following info; Email, Display Name. and Password. BE SURE TO ADD A COMPLEX PASSWORD. See this article on password security. Hacking is at an all-time high!
Remember to verify that the User is not already in the system. If an account already exists for a user an error will appear at the top of the screen and not let you create the new User Account.
-
How do I edit a User Account?
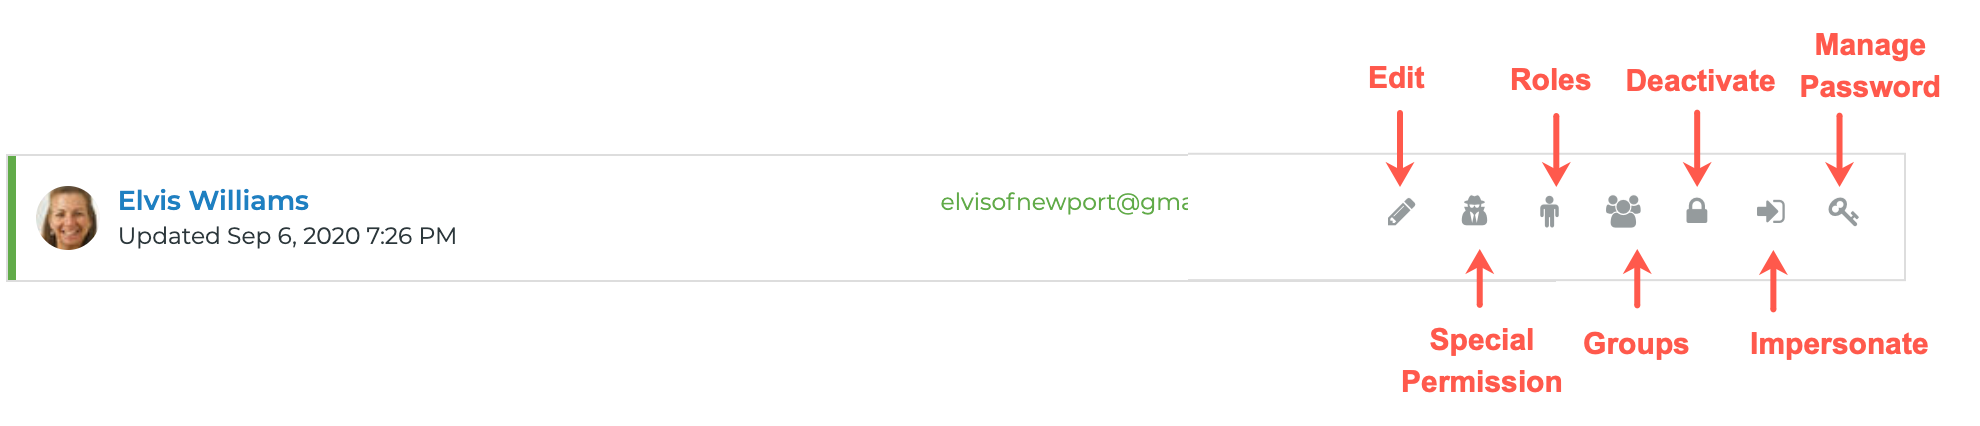
To edit an account click on the Pencil icon to the right of the proper account. - How do I reset a password?
To reset a person's password click on the Spinning Arrow icon to the right of the proper account.
Note: If you are using Clever to log in, you will not be able to reset your password in SchoolNow. - How do I add a Role to an Account?
Navigate to the proper account under Accounts and click on the Person icon to the right of it or do a search for the User in the search function located at the top of the screen. Select the Role that you want to assign to the account, the Department the role should be associated with, the Inheritance of the role, and finally Apply. The inheritances that are available are the following;-
Single Department - The role is associated with the Department that you chose but not any sub-departments that are located inside of it.
-
All Sub-departments only - The role is associated with all of the sub-departments of the Department that you chose.
-
Single Department and all Sub-departments only - The role is associated with the department and all of the sub-departments of the Department that you chose.
-
- How do I add a Group to an Account?
Navigate to the proper account under Accounts and click on the Group icon to the right of it or do a search for the User in the search function located at the top of the screen. Select the Group that you want to assign to the account and finally Apply. - How do I Deactivate/Activate an Account?
To Activate/Deactivate an account, navigate to the proper account under Accounts and click on the Lock icon located to the right of it. - How do I impersonate another Account?
See the following article, Impersonate. - What does the vertical color bar to the left of an account mean?
On the left side of the account, you will see a vertical bar, normally this will be grey. If the vertical bar is green it means that the account is a Super User. But if the bar is red it means that the account has been deactivated.
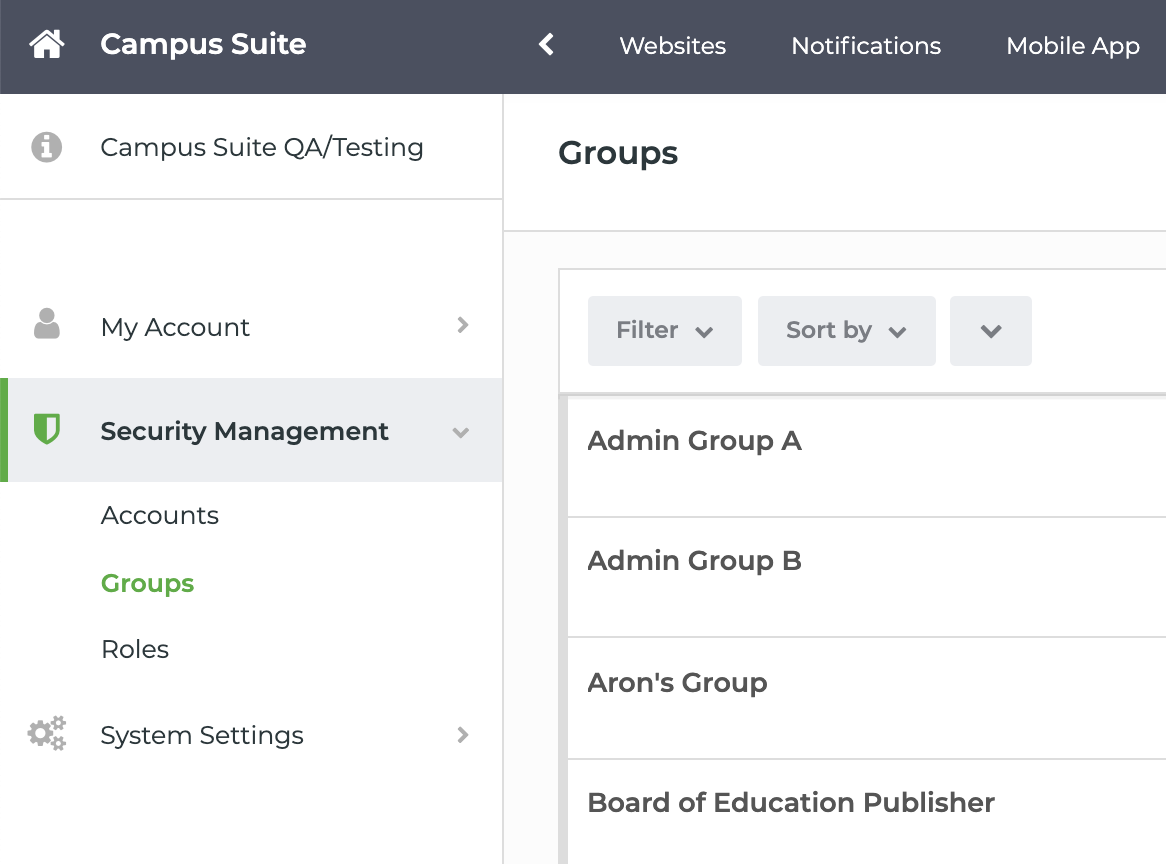
Groups and Roles
From your dashboard click on Settings followed by Security Management to find both Groups and Roles. You can apply roles to both groups and users. Users can be members of groups that have roles applied to them. Don't worry too much yet about keeping track of all this, just know that this methodology allows you to dial in permissions and restrict certain people, and even groups of people. As you manage your new SchoolNow website, you will reveal certain things you want to open up or restrict access to. Our support team is here to either answer your questions or even help you set up special security roles that work best for your organization.
-
What are Groups?
If you have multiple users, especially ones who need similar access requirements, it would be cumbersome to assign the departments to each user individually. This is where groups come in handy. In SchoolNow’s Security Management center, groups provide defined access privileges to specified departments in your system. You can set up these groups, determining what department(s) can be accessed and at what permission (Role) level. This keeps you from having to go in for each user and make the needed associations between them and the departments. -
How do I create a new Group?
To create a new Group go to Security Management in the side navigation on the dashboard and select Groups. In the upper right-hand corner is a green +CREATE. Click on that and enter the title of the new group.
-
How do I edit a Group?
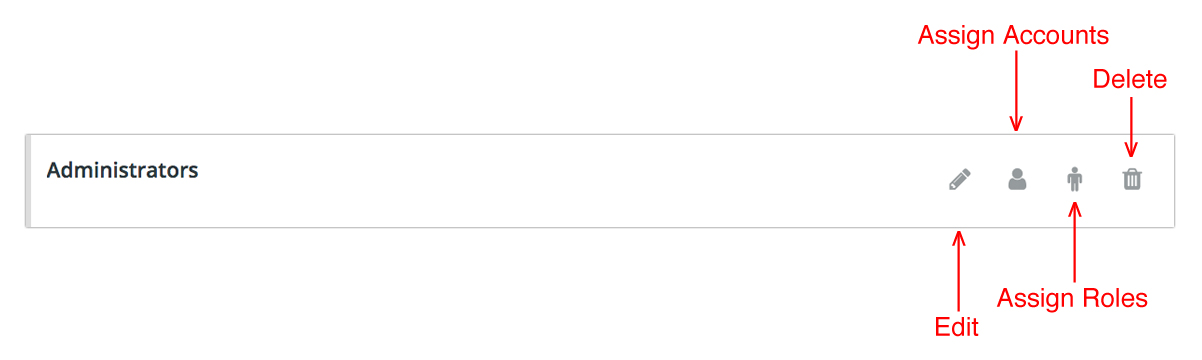
While in the Groups menu, click on the Pencil icon to the right of the Group that you would like to edit. -
How do I edit a Group (Adding and removing people)?
While on the dashboard under Settings, click on Security Management, and select Groups. Click on the Silhouette icon to the right of the group you would like to associate people with and choose the people that you would like to be part of the group and click save. -
How do I assign a role to a Group?
Select Groups under Security Management while in Settings. To the right of the group, you would like to associate a role too, click on the Person Icon to the left of the trash can. Enable the roles you would like to assign to the group and click save. -
How do I delete a Group?
Go to Security Management under Settings and select Groups. Click on the Trashcan icon to the right of the group you would like to delete. Confirm that you would like to delete the group and click Ok. Once deleted, a group is gone and cannot be recovered and will have to be manually rebuilt.
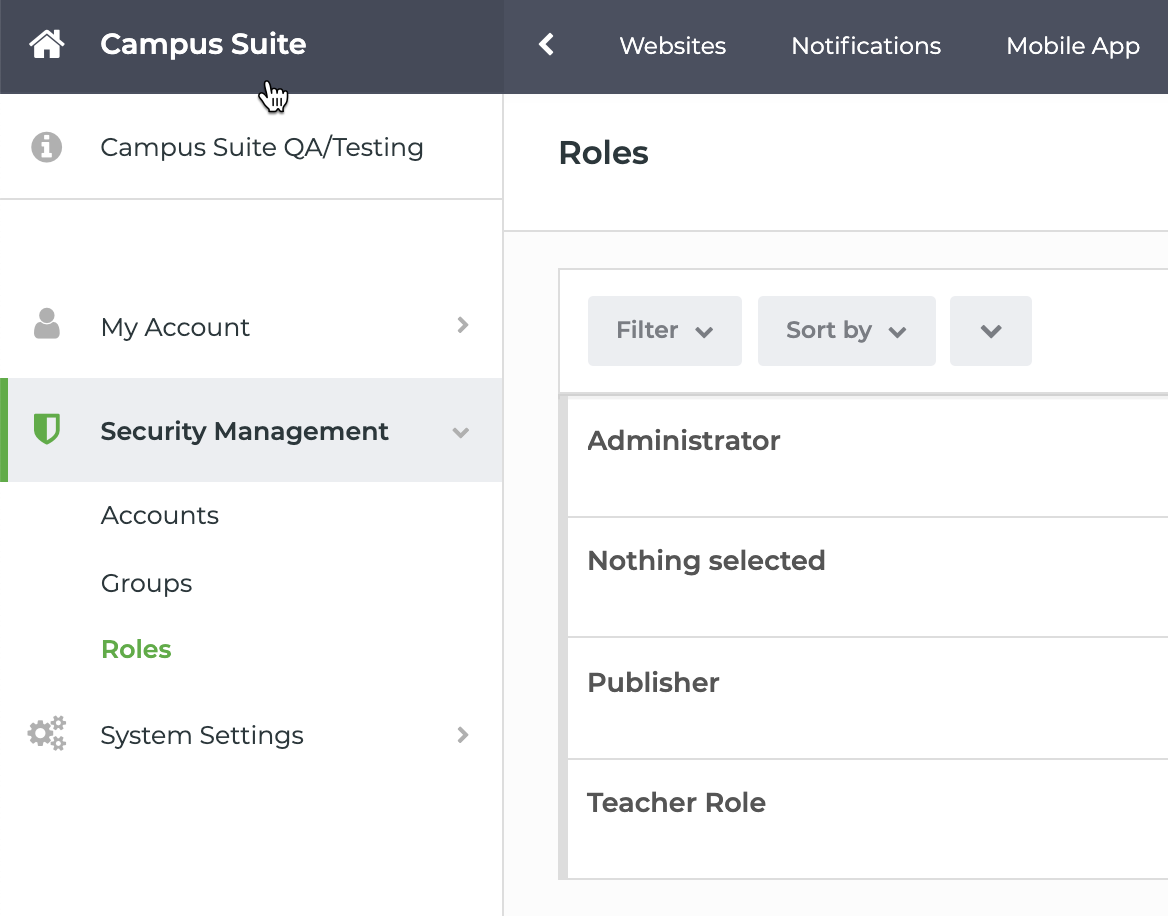
Roles
-
What is a Role?
Use Roles to set permissions to actions in SchoolNow. Some examples include; fully manage websites, manage imports, manage redirects, manage iCal syncs, manage drafting workflows, manage security groups, etc. SchoolNow is always adding new roles as new features roll out. Being able to create roles and apply them to groups or individuals streamlines the way an administrator can granularly manage the permissions and access to many people. -
How do I create a new Role?
To create a new Role go to Security Management under Settings and select Roles. In the upper right-hand corner is a green +CREATE. Click on that and enter the title of the new group.
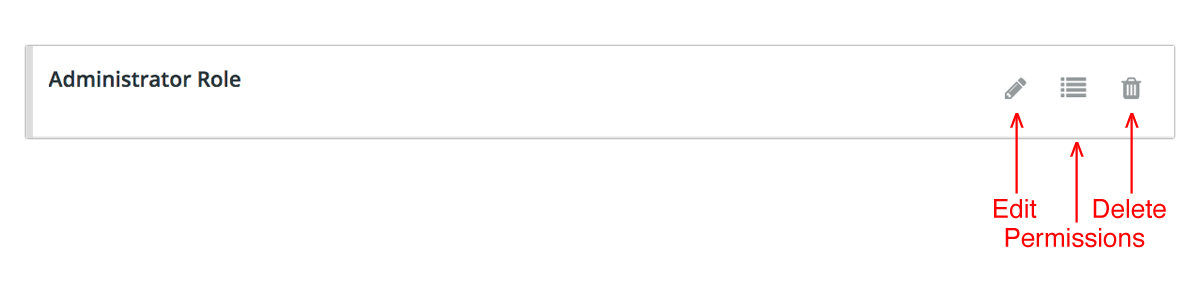
- How do I edit a Role?
While in the roles list, click on the Pencil icon to the right of the Role that you would like to edit. -
How do I edit the Permissions in a Role?
While in the roles list, click on the Bulleted List icon to the right of the Role you would like to edit the permissions for.
What does each of the permissions allow?
Each of the permissions gives the ability for a Role to do certain things in SchoolNow. Allowing Admin to create roles to do specific things, for example, a calendar manager who is allowed to manage the data for calendar modules and manage iCal syncs. Below you will find a list of the permissions that can be assigned to a Role and a short description of each.
ADA
- Miscellaneous
- Manage the subscription-only ADA features of SchoolNow
CMS
- Administrative
- Manage domains - Allows a user to view and use the Domain Configuration menu under Site Settings.
- Manage iCal syncs - Allows a user to create and update iCal syncs.
- Manage locks on data in the system - Allows a user to view and use the Locks menu under Site Settings.
- Manage redirects -Allows a user to view and use the Redirects menu under Site Settings.
- Manage system-defined tags - Allows a user to see the Tags menu under Site Settings where they can create and manage tags.
- Manage global/universal Campus Suite account information
- Manage imports - Allows a user to view and use the Imports menu under Site Settings.
- Manage process checklist - Allows a user to view and use the Process Checklist while developing the website.
- Manage siteplans - Allows a user to view and use the Site Builder menu in the side navigation
- Manage themes, layouts, and content templates - Allows a user to see the Design & Layouts menu under Site Management where they can edit the themes of their website.
- Analytics
- View system log data
- View system statistical usage data
- Debugging
- Permission for SchoolNow testing purposes
- Departments
- Fully manage any teacher sites - Allows a user to manage personal sites.
- Fully manage websites - Allows a user to manage and edit websites
- Fully manage intranets - Allows a user to manage and edit intranets
- Modules
- Fully manage data of any module type - Allows a user to manage the data of any module.
- Manage data for Blog modules - Allows a user to create, edit, move and delete Blog Posts.
- Manage data for Gallery modules - Allows a user to create, edit, move and delete Galleries.
- Manage data for Page modules - Allows a user to create, edit, move and delete Pages.
- Manage data for Question modules - Allows a user to create, edit, move and delete Question
- Manage folders and files - Allows a user to upload and manage files in SchoolNow.
-
Manage data for Alert modules - Allows a user to create, edit, move and delete Alerts.
-
Manage data for Calendar modules - Allows a user to create, edit, move and delete Calendar Events.
-
Manage data for News modules - Allows a user to create, edit, move and delete News Articles
-
Manage data for People modules - Allows a user to create, edit, move and delete People.
-
Manage data for Shared Content modules - Allows a user to create, edit, move and delete Shared Content.
-
Manage web department navigation - Allows a user to edit and manage the side navigation of departments through the navigation editor.
- User Privileges
- Allow full management of a user's people profiles - Allows a user to create and manage user's profiles.
- Allow teacher sites - Allows a user to create and edit a personal site.
Notifications
- Miscellaneous
- Fully manage notifications data - Allows a user to create and manage notifications.
Platform
- Security
- Manage security groups - Allows a user to view and use the Groups menu under Security Management.
- Manage user accounts - Allows a user to view and use the Accounts menu under Security Management.
- Manage security roles - Allows a user to view and use the Roles menu under Security Management.
User Accounts vs. User profiles
Do not confuse user account logins with user profiles. User profiles comprise your organization's directory listings. User accounts and user profiles are two separate entities representing the same person in your organization. User profiles are managed under the People tab at the top of each department. So for example, to see all of the 6th-grade math teachers, you might look under the People filter under the Academics department. Here, you can click a person's name to edit their profile data. They are also able to access and edit their profile data.
Additional Articles