You can send out a message that will notify people via voice, text and email, post to your social networks and even put an alert on your website!
 Send an instant notification to your selected audience. Create lists ahead of time that will send notifications to faculty/staff, school admins and parents. You have the ability to send messages through various channels such as voice (for emergencies only), email, text, and even post to your social networks. Additionally, you can also post messages as alerts on your website with the option to set an expiration date...all in one easy step.
To create a message
To begin, click on the green "Create Message" button located at the top-right corner of the main dashboard or messages screen. From there, you can select the type of message you want to send, either General or Urgent. You will then be prompted to choose a template or "Skip and start from scratch."
-gif.gif)
TIP: For ease and reliability, we have provided you with some default message templates. This reduces accidents like sending a message with the wrong priority or missing an important channel. You can create unlimited message templates that work best for the types of messages you most often send.
Complete the fields as needed. See the numbered steps below.
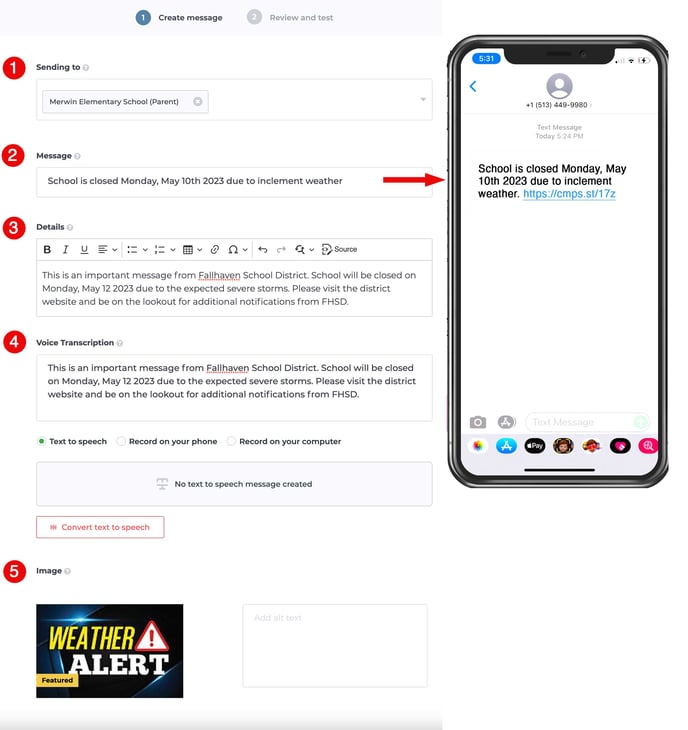
1. Select the list(s) that you will be sending to.
TIP: By setting up broadcast templates ahead of time, the proper lists and urgency will automatically set.
2. Enter a brief and meaningful title for your message up to 140 characters.
NOTE: The content you enter here will used for text messages sent to those receiving texts, so make this descriptive, but concise.
3. Enter the details of your message. You can be more descriptive here and use basic formatting in this field. This will be used as the content of any emails that are sent out.
4. Voice messages are ONLY available for Urgent/Emergency messages. You have a variety of ways to record your voice message but the most common is text to speech.
NOTE: It is required that you type out your message in the voice transcription field regardless of the way you plan to create your voice message. This is important because our voice synthesizer uses the text to generate recordings in different languages as needed. Additionally, having the text available allows you to read from it if you prefer to record the message using your own voice.
Other options to record your own voice are to use your computer and microphone or have the message center call your phone to record your message.
5. Adding an image to your message really makes an impression. Images can be added to templates so they are available when the template is used, and you can also remove and change out an image before proceeding to the next screen.

Once done, click the green Next button at top-right.
Please allow some time for your text to be translated and for the voice parts of your message to be synthesized into the required languages. Once this process has completed, you will land on the message review screen.
When you arrive on the review screen, you will be given the opportunity to double-check to make sure all your information and settings are correct before sending. See the numbered areas below.
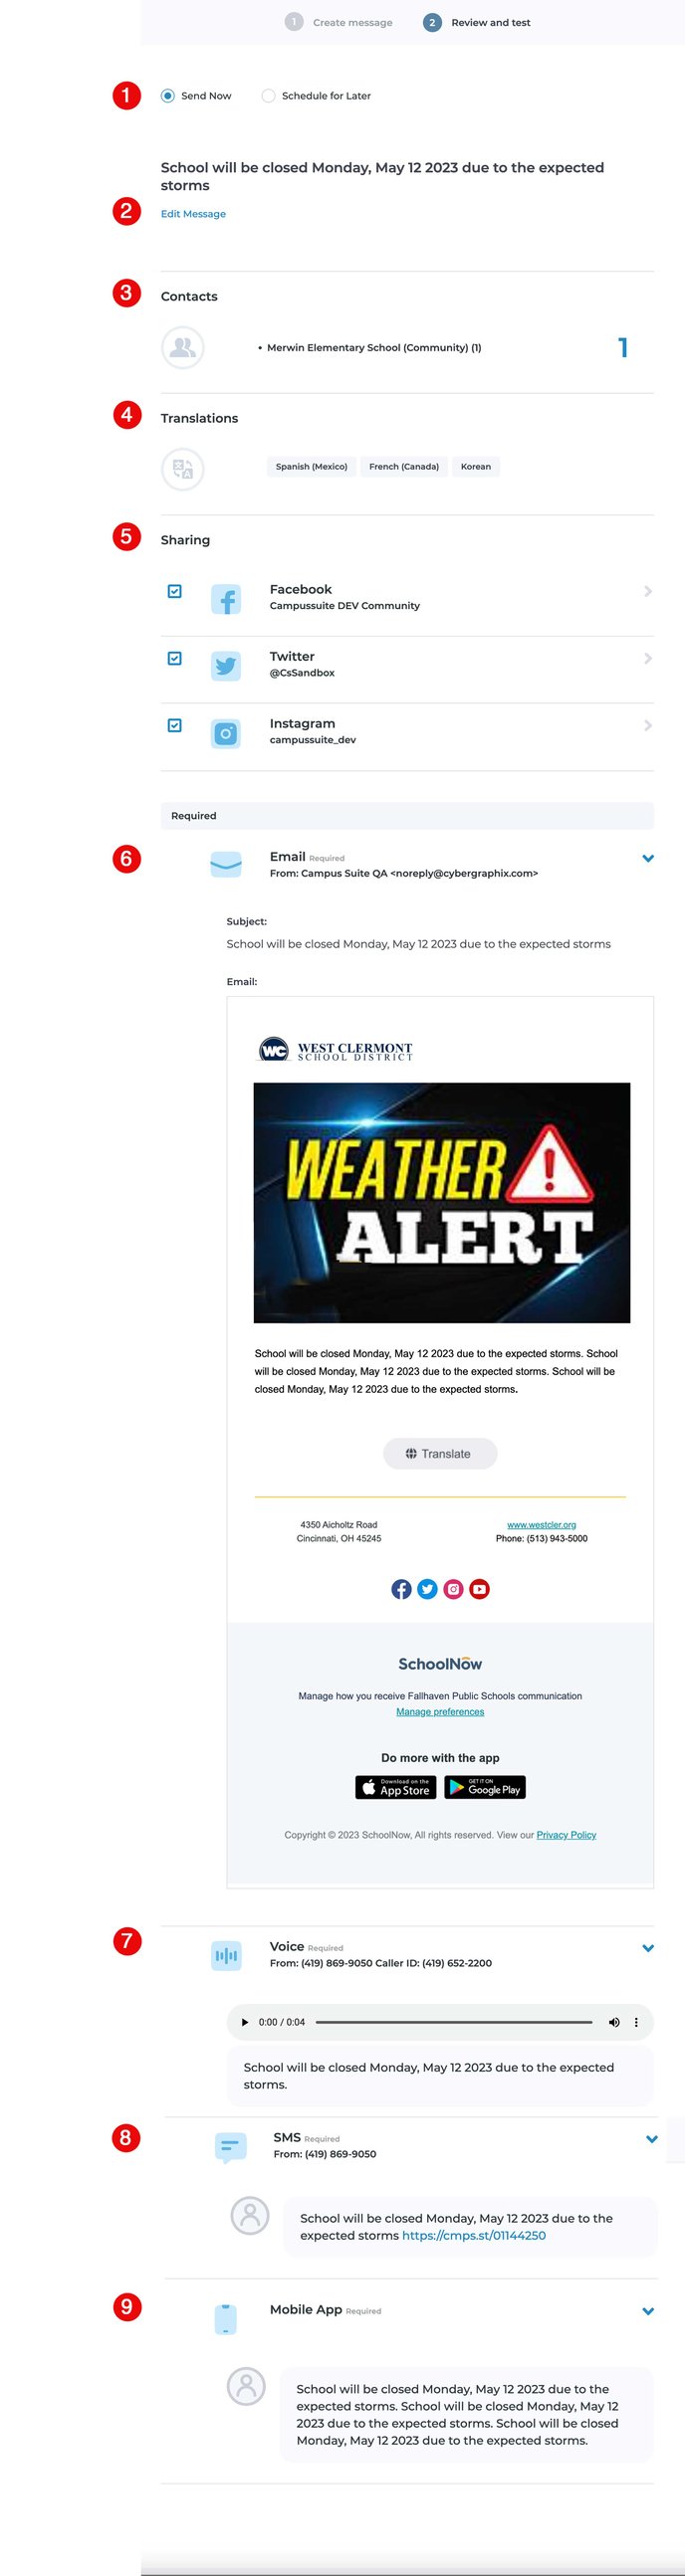
1. You can choose to send your message now, or schedule it to go out in the future.
2. Under the subject of your message, you will see a link named "edit message" that will allow you to go back to the message compose screen and edit the message.
3. These are the list(s), along with the total number of contacts the message will be sent to.
4. The languages your message will be sent out with. Click any language to review and edit the text and voice translations of your message.
5. The social networks your message will be syndicated to. Click the checkbox to the left of each to include or exclude syndicating to that network. Click the arrow to the right to open it and confirm your settings.
NOTE: You need to have your social networks pre-authorized in order for them to be used in templates and messages.
6. If you are sending out an email, confirm the subject, image and message content is correct. Here you can see what the email will look like in someone's inbox.
7. If you are sending out a voice message (Urgent/Emergency broadcasts only), you can preview the voice recording along with its transcription.
8. Review the text that will be sent as an SMS message to mobile phones. We automatically accommodate a shortened link that people can click to read the full message detail.
9. This is what the push notification to the app will look like.
NOTE: When sending an Urgent/Emergency message, it is important to note that the Email, Voice, SMS, and Mobile app channels are required. This ensures that your critical message reaches everyone, regardless of their personal preferences.

Once you have reviewed and finalized all the details, you have the option to select "Send Test" and enter the email addresses and phone numbers of some colleagues. This allows you to send a test message to them before sending it out to a larger audience. When you are ready to send the message to everyone, simply click "Send" to immediately distribute the message.